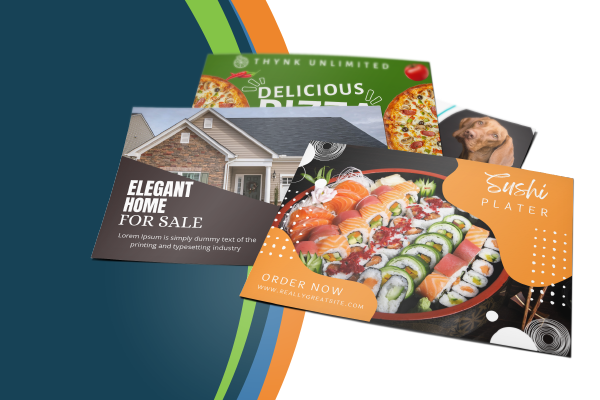
Commingled Postcards

- Flat per piece rate
- No minimum postcard mailing
- Extremely fast turnaround
- Turnkey mailing
Direct mail commingling—also known as “postcard commingling,” “commingling mail,” “commingling direct mail,” or "commingled direct mail”—is a mailing and printing option that allows you to print low quantities with fast turnarounds while taking advantage of bulk mail discounts. Basically, it is no minimum postcard marketing at an extremely affordable price.
How it works is your order is combined with other companies' orders, so when combined, they create one large mailing that qualifies for the lowest postage rates available.
When designing your commingled postcard, be sure to use a commingled postcard design template to ensure your postcard is designed perfectly to qualify for commingling mail. If you need any help designing, don’t hesitate to reach out; our design team is here to help!

We stand behind our work. Every order is backed by our 100% Total Satisfaction Guarantee so you can buy with confidence.

With our headquarters in Richmond, VA, we have been proudly producing every job in the United States of America for over 100 years.

With over 100 years in the business, we have the experience to complete your job perfectly. Read what others have to say.
If this is your first time ordering this product, or you'd like additional guidance with your design, feel free to use the template below or reach out to us for assistance. To gain access to all of our free design templates, check out our templates page.
Take advantage of direct mail without a minimum quantity, spend, or mail list size needed...

Direct mail marketing has proven to be a powerful way to advertise your business and increase...

Let’s take a look at the importance of following up and some successful ways you can...

Marketers may be utilizing online marketing more in this digital age, however, these facts about direct mail...

Direct mail is a tangible, personalized, and uncluttered medium that boosts brand recognition and...

If you aren't reaching the right audience, your direct mail campaign willresult in wasted money and less than...
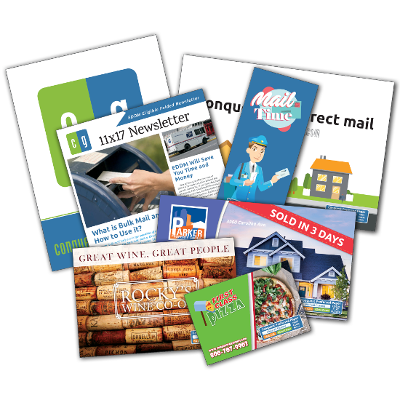
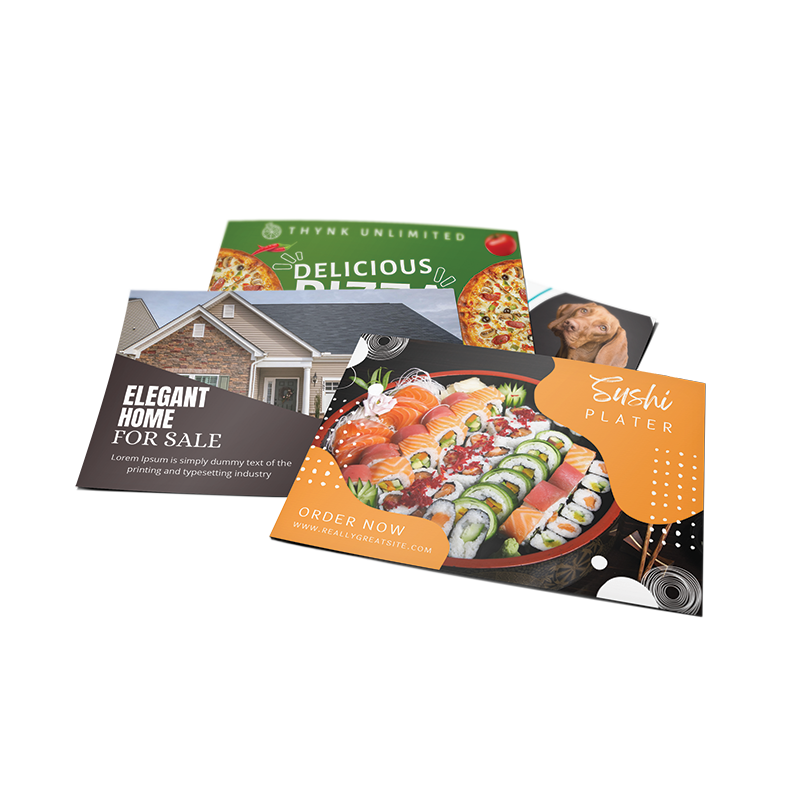
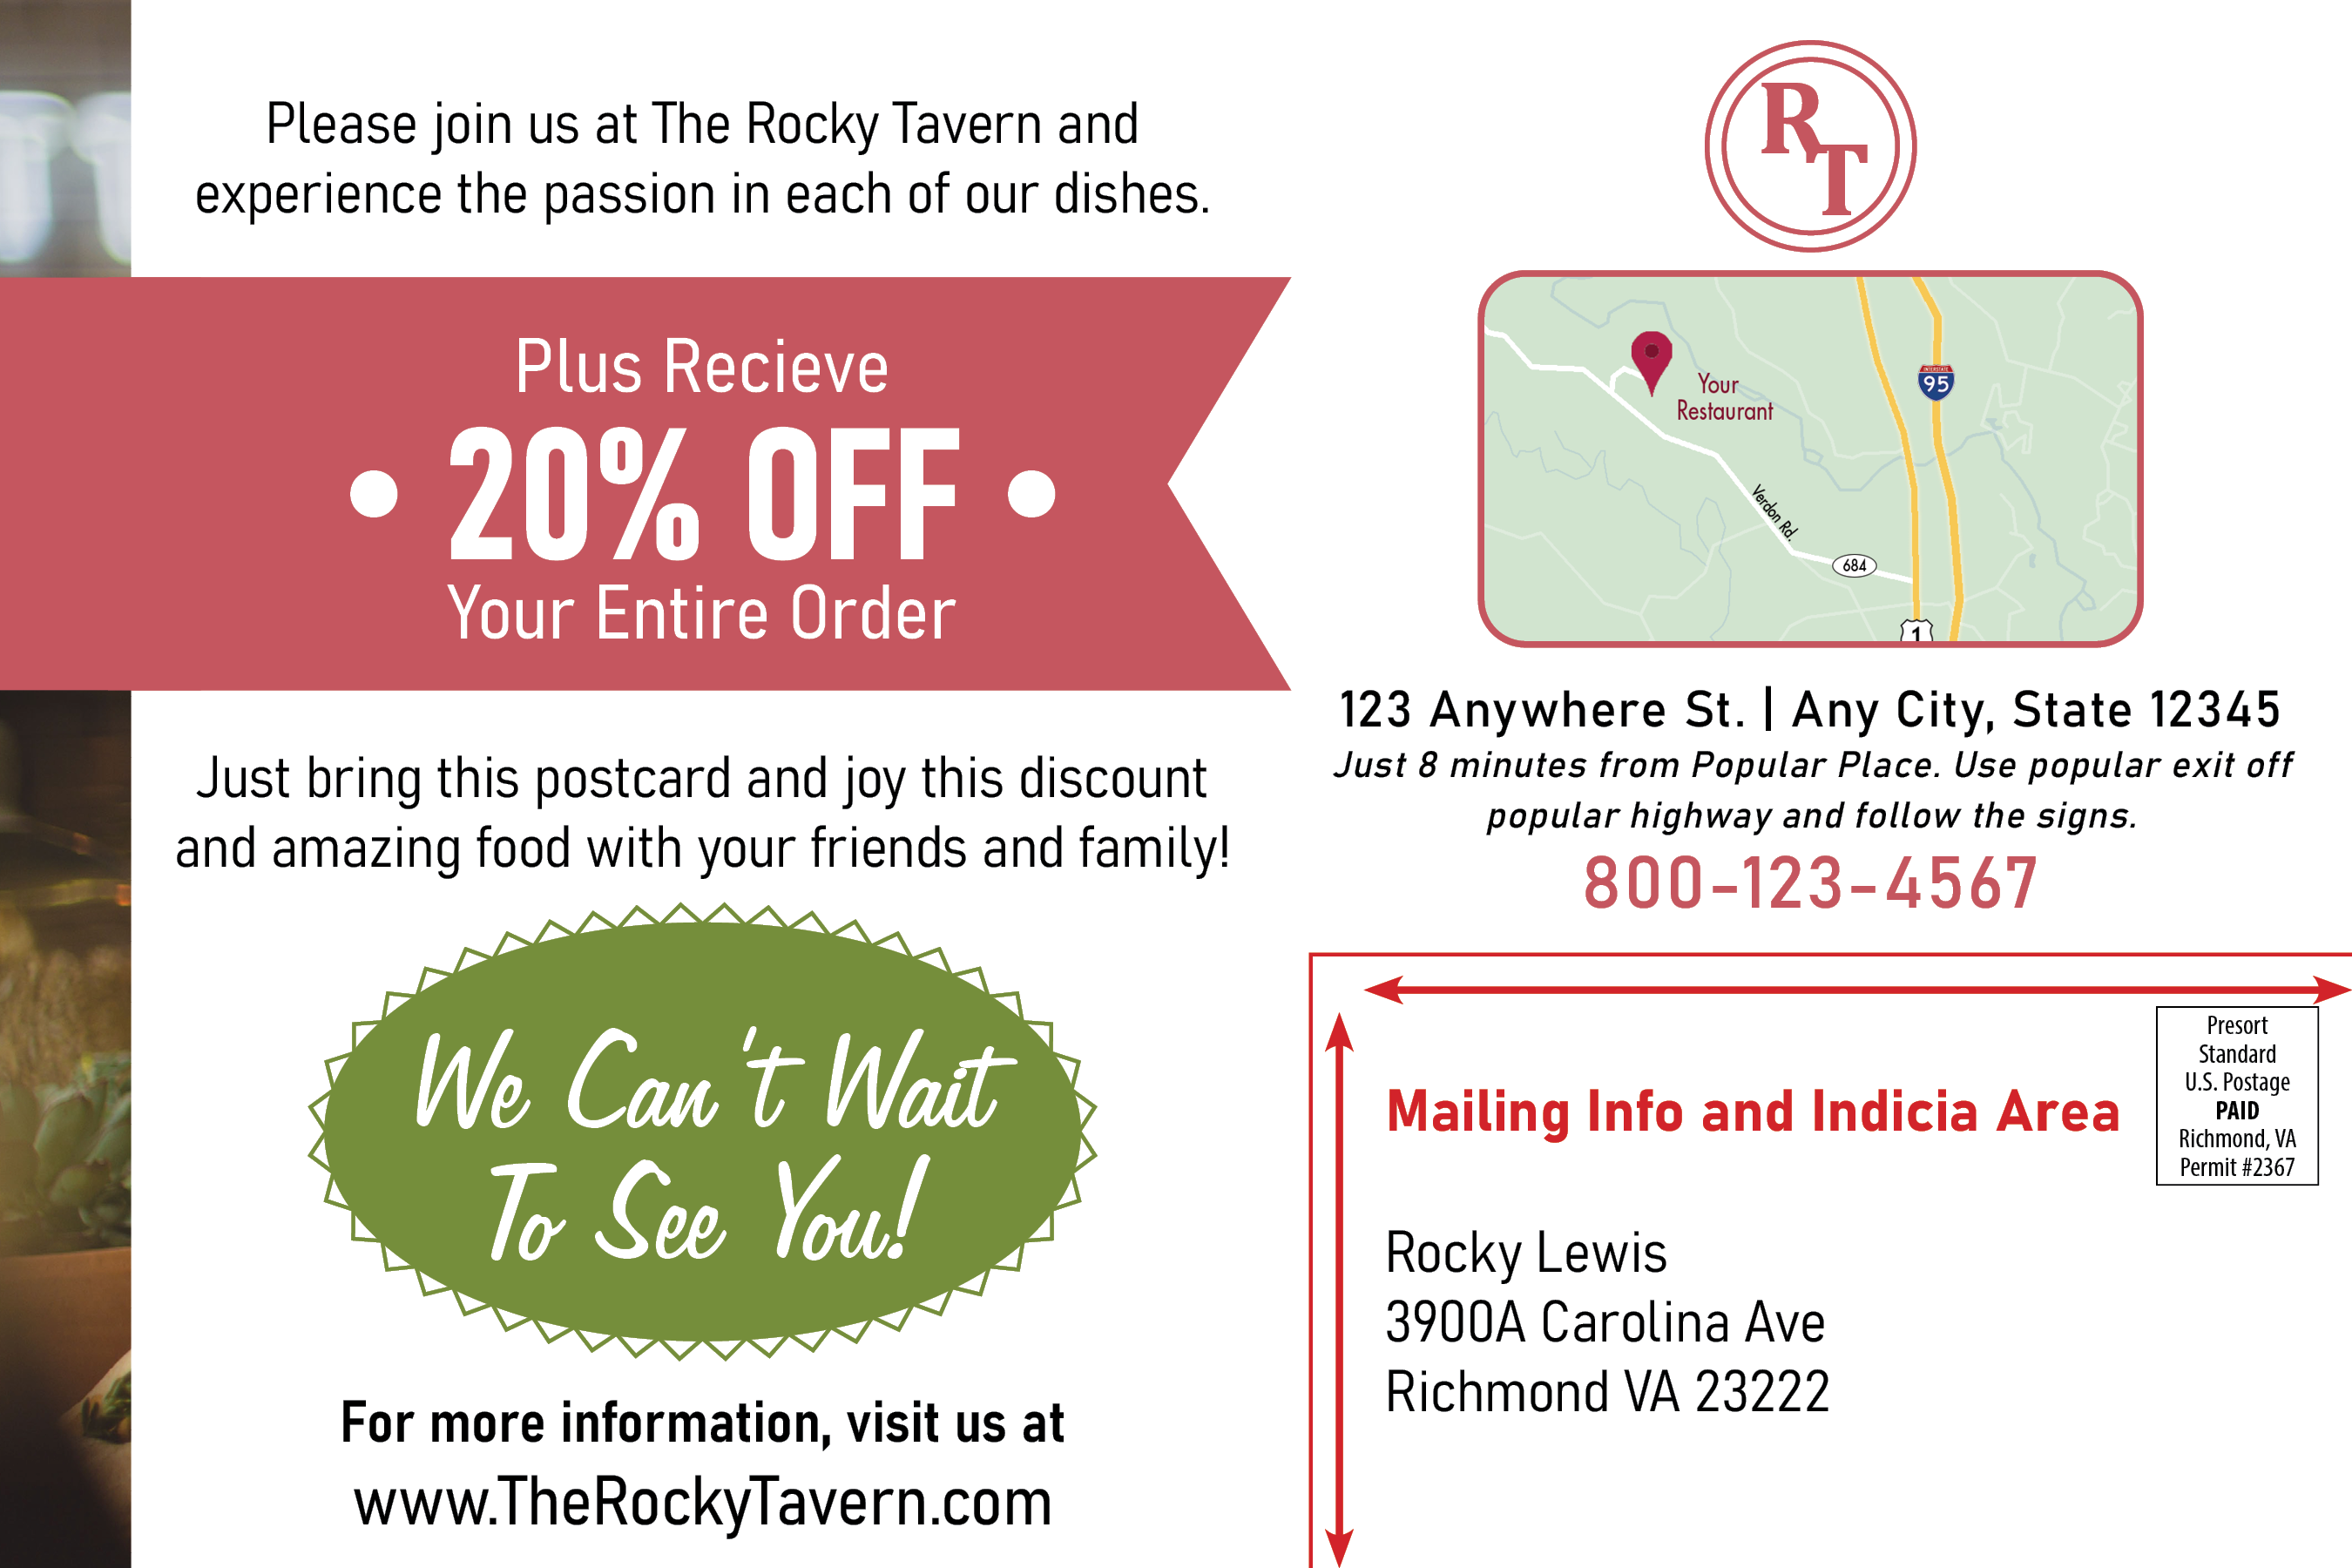
Postcard Commingling is a special type of postcard mailing. It allows you to mail a low quantity of postcards, but you still qualify for bulk mail discounts.
How does this work? Well, it works because even if you mail 1 postcard, your postcard mailing is combined with other companies’ low quantities, and by combining them, everyone gets to take advantage of postage discounts through bulk mailing.
Because separate postcard mailings are combined, there are guidelines to follow for the type of postcard and the postcard design.
For example, to qualify for Commingled Postcard mailing, you must mail 6x9 postcards. Also, when designing your postcard, you must leave a specific area blank. This is because, for every different postcard design, the mailing indicia must be in the same spot. This spot is within the 4x2.25 mailing information area, which you leave blank on the back of your postcard design. See below for where you can expect mailing information and the mailing indicia to go. For help with your design, you can take advantage of our 6x9 postcard design template or contact our design team.
To create an account, please click on the "Login" link located at the top right of the navigation bar.
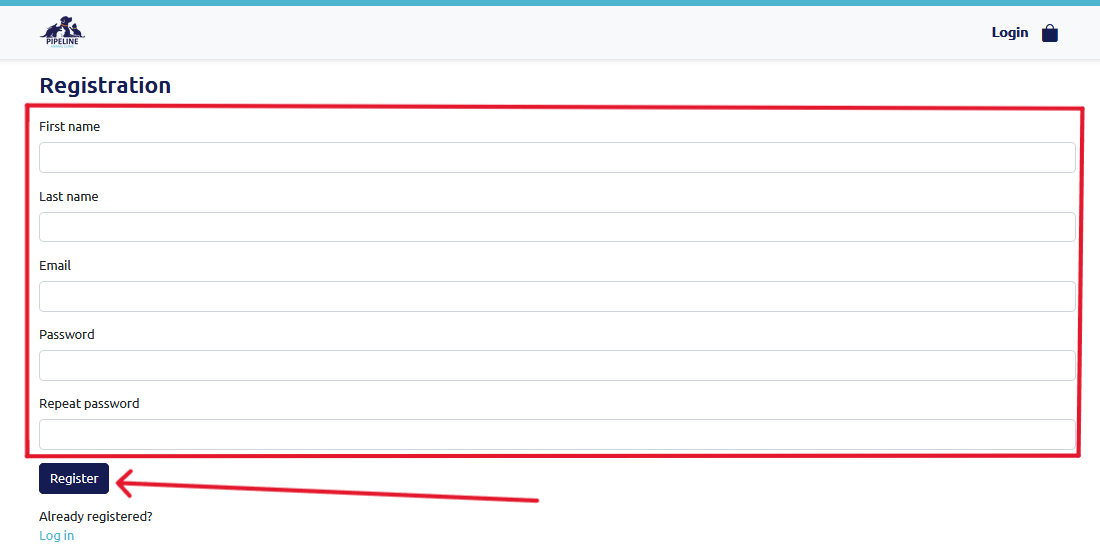
You will be directed to the login page. From here, click on the "Register now" link located under the "Log in" button.

You will then be directed to the registration page. Fill in all fields. The email you fill in will be your Username for logging in. After filling in all of your information, click the "Register" button. This will direct you back to the Login page where you can fill in your Username (the email you used to register) and your password.
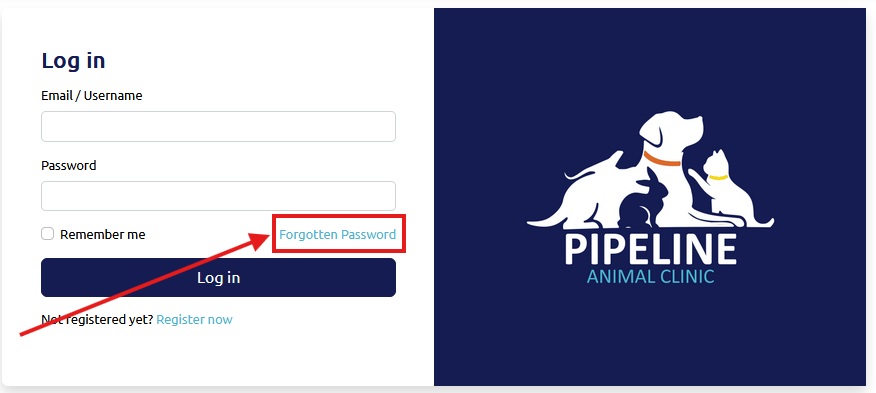
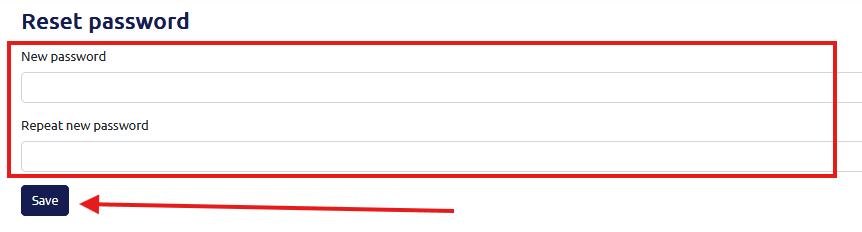
On the Login page, click the "Forgotten password" link located above the "Log In" button.
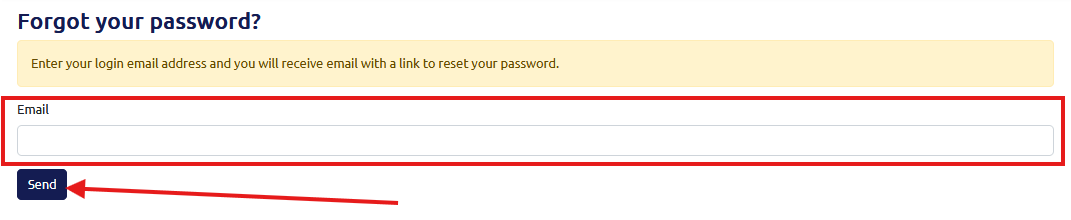
This will direct you to a new page. Enter your email (this is the username you use to log in) and press "Send." You will receive an email from us; please click on the link in the email to reset your password.
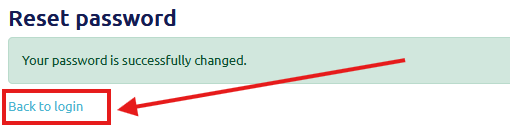
You will be directed to a screen like the one below, asking you to add a new password and then repeat it. Once you have entered your new password, click "Save" and then "Login" to go back to the Login page, where you can log in using your new password.
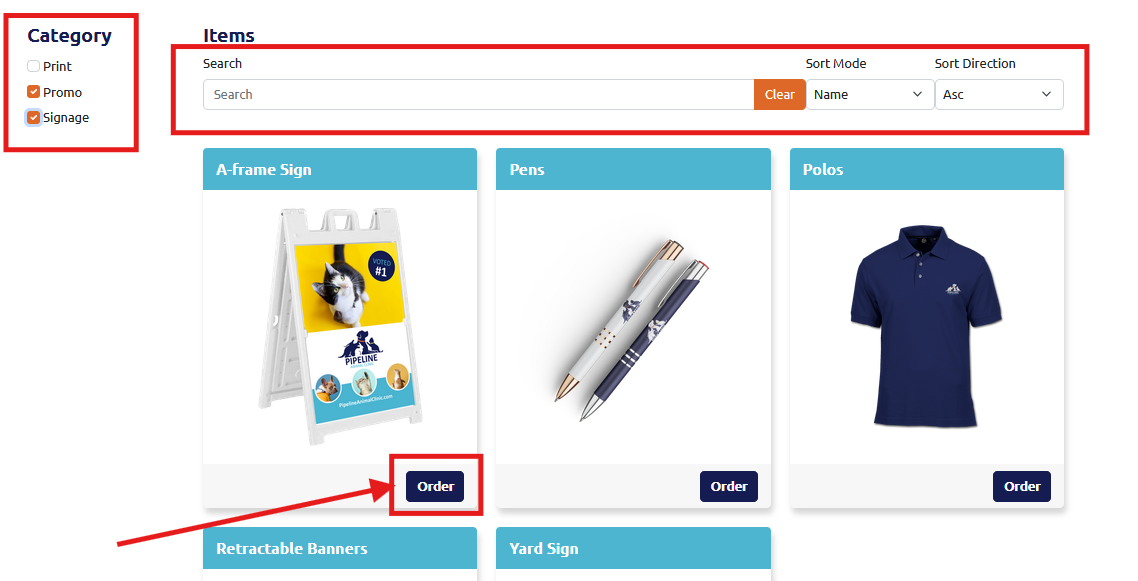
To begin ordering, please log in to your account. You can log in by clicking the "Login" link at the top right of the navigation bar and using the email address you used as your username during registration. Once logged in, you will be able to view and shop for all products associated with your account and brand.
If applicable, you can filter your brand's products using the checkboxes to the right of your screen, the search bar, or the Sort Mode and Sort Direction dropdowns. Click the "Order" button for the product you would like to order.
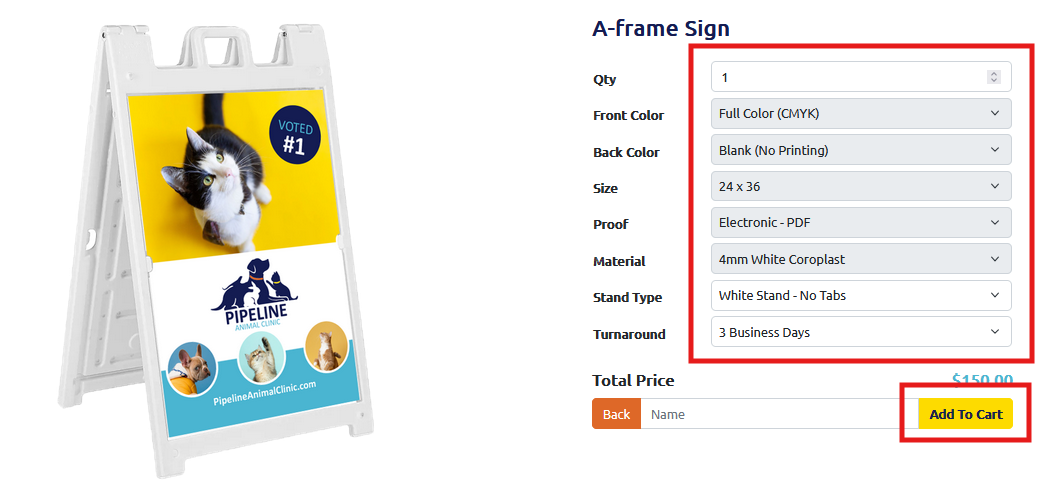
For static products (products that do not require customization), you can select specific options that are not grayed out, including your quantity, turnaround time (the time it takes to print your order), and add a Name for your job. Then, press "Add To Cart." Any options that are grayed out cannot be changed.
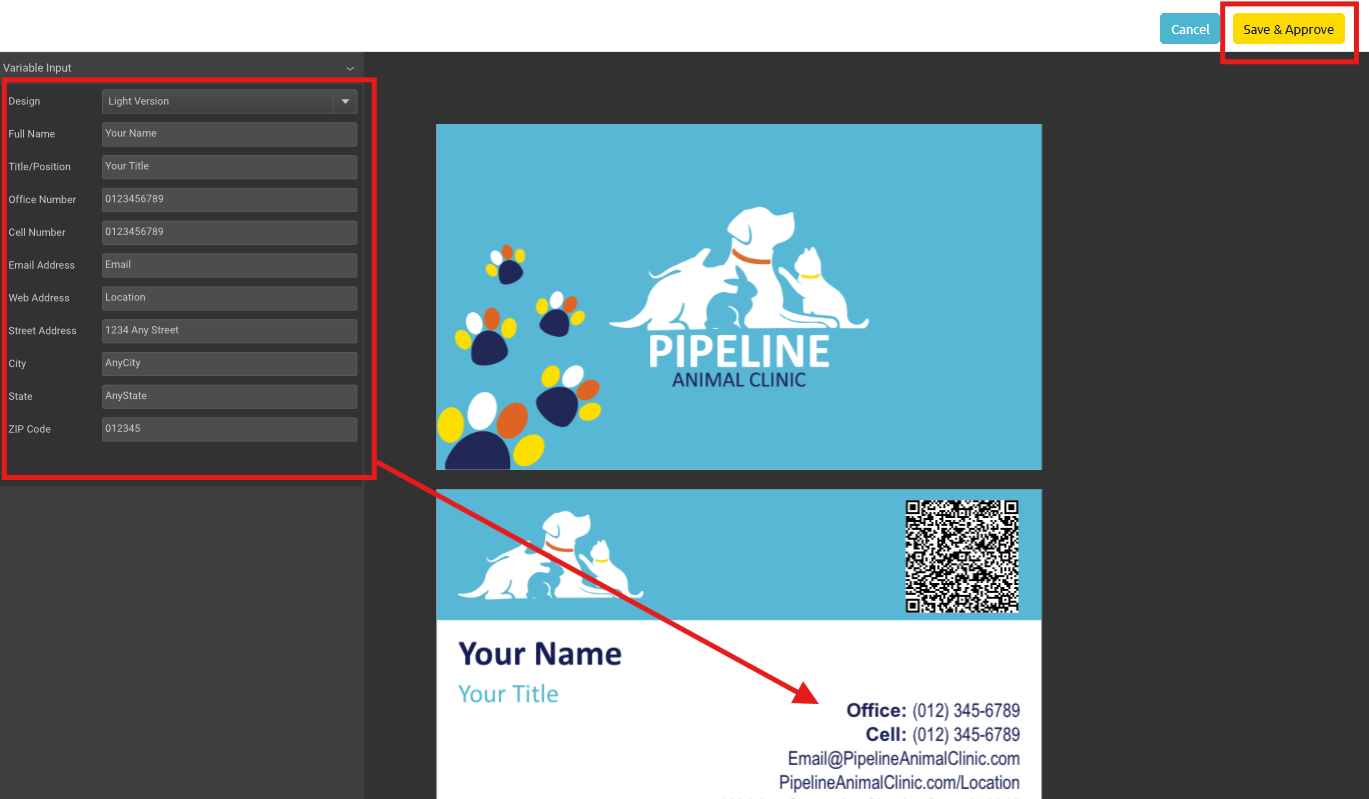
For design products (products that can be personalized), you will need to select or input any options that are not grayed out. Then, press the "Design" button to begin personalizing your product.

A new view will appear, allowing you to begin personalizing your product. Insert any needed fields, such as contact information, background colors, images, etc. You will see the design populate your information. This is exactly how your product will look when printed. Once you have completed your customization, click "Save & Approve". This will take you back to the product page, where you can click on "Add To Cart" to proceed.
By clicking on "Add To Cart," you will be directed to your cart, or you can access your cart at any time by clicking on the bag icon in the top right of the navigation. Here, you will see all current products in your cart. You can edit your design from here if needed, delete, save a product for later, or upload files if required. Please note you can upload files after checking out as well. Once you are ready, click on "Checkout" to begin the checkout process.
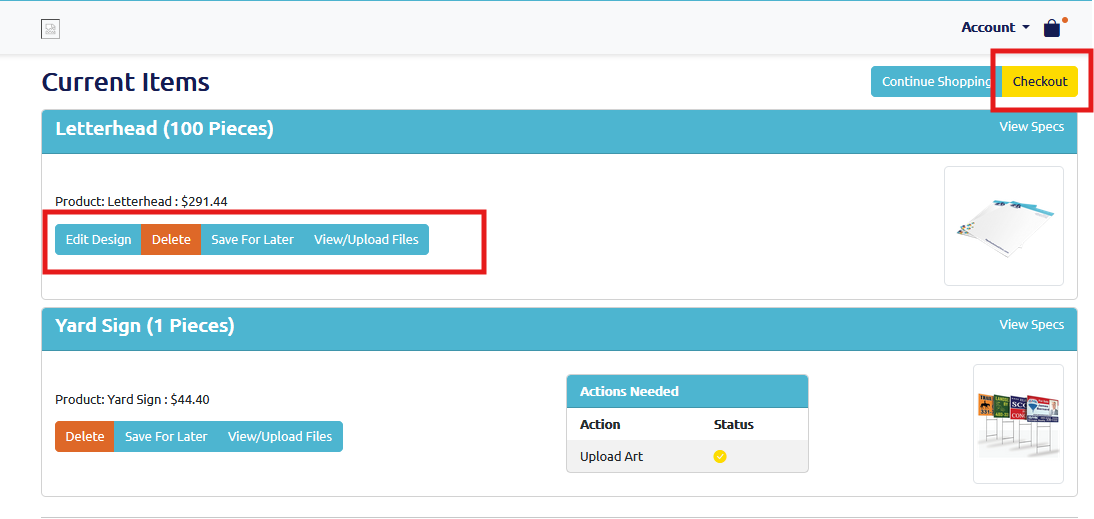
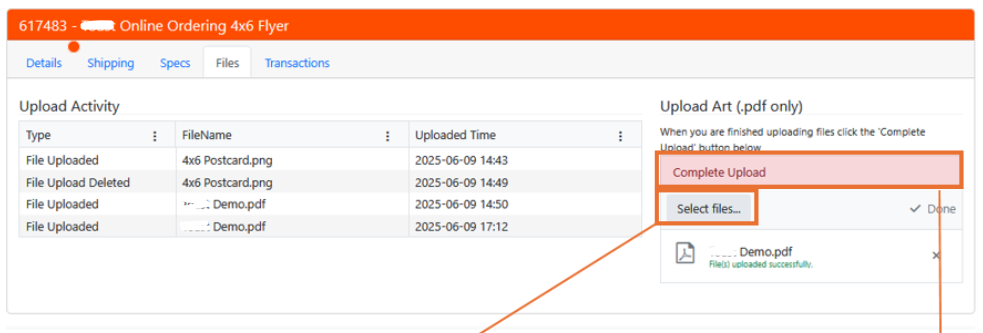
For products that require an uploaded art file, you can click on the "View/Upload Files" and then drag and drop files or select from your local files. After uploading, click "Complete Upload." After completing the upload successfully, the "Actions Needed" status will show a checkmark. Now, you can click checkout to proceed. Or you can skip the upload file process and upload your files after checkout by visiting "Your Jobs."

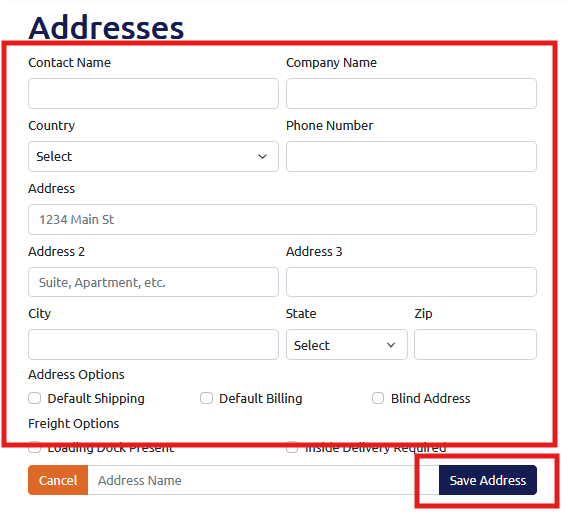
If this is your first time ordering, you'll be directed to a Shipping Address input screen. Input all relevant shipping information. You can then set this address as your "Default Shipping" or "Default Billing" to have it prepopulate in the future. Name your address and click "Save Address" to save it to the address book held on your Account. You'll then be taken to the Shipping Information Screen.
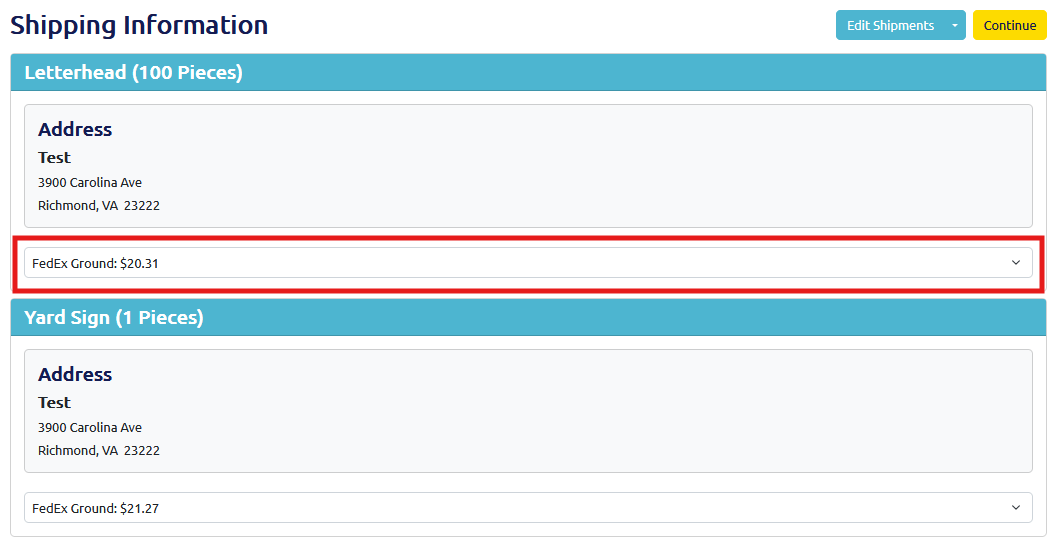
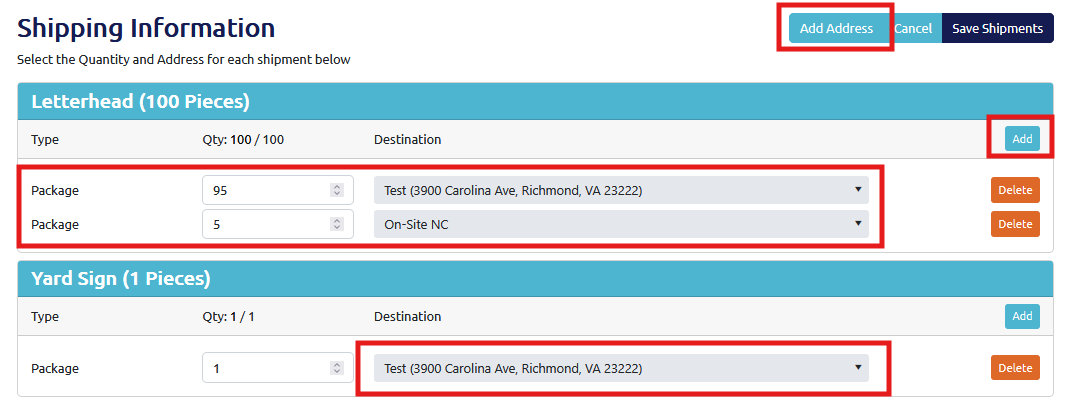
On the Shipping Information screen, click on the "Edit Shipments" button to change or add an address or split a shipment. To change the shipping type/carrier, click on the dropdown highlighted below to show a list of shipping options.
If you click on the "Edit Shipments" button, you will be directed to the Shipping Edit screen. Here, you can add a new address by clicking on "Add Address." You can change the shipping destination on this page by selecting the destination dropdown and selecting an address listed in your Account's addresses. To split a shipment, click "Add" to add multiple packages and send each package to different locations. Ensure the quantity totals the total quantity specified in your order. Once ready, click "Save Shipments" to return to the Shipping Information screen and then press "Continue" to proceed to Checkout.
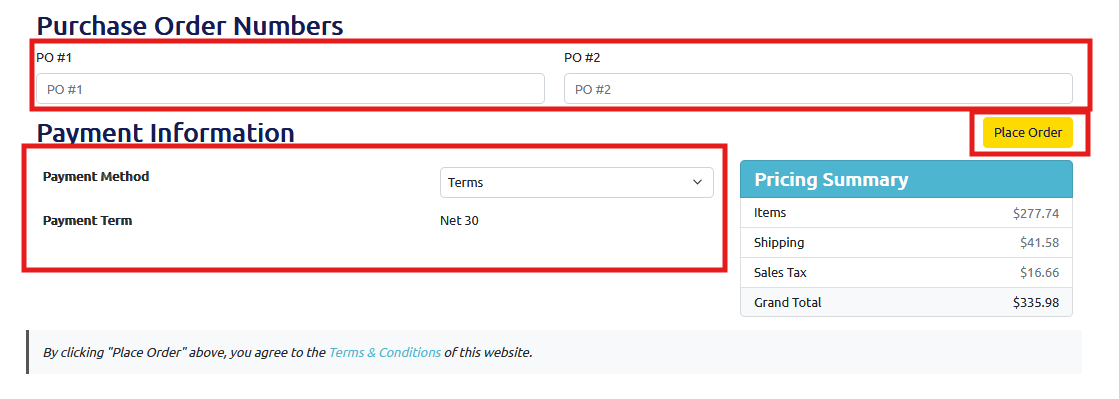
After clicking on the "Continue" button, you will be directed to the payment page. Here, you can enter Purchase Order #s, if desired, which are provided on invoices for the order. Your brand may be set up with Terms, in which case, you will see a similar screen to the one below. If your brand requires payment at checkout, you will see a field to insert a payment method. Once ready, click "Place Order."
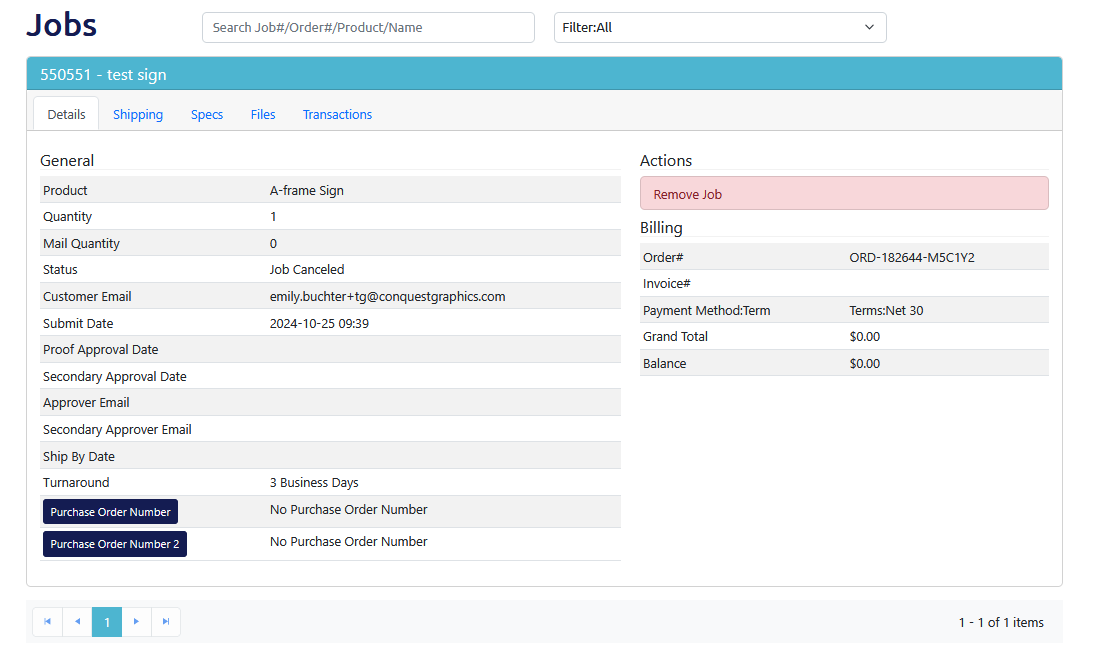
At any time, you can visit your past and current jobs by clicking on the "Your Jobs" in the "Account" dropdown. Here you will find all your jobs and their information. You can also upload art or mailing files here if needed and filter your jobs by status.
For products that require an art file upload, you will need to approve your proof so that your job moves into production. Once your proof is ready, you'll receive a "Proof Ready" email. Click on the link to go to your portal login page.

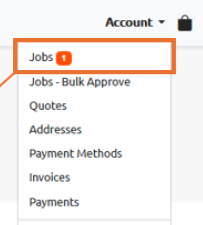
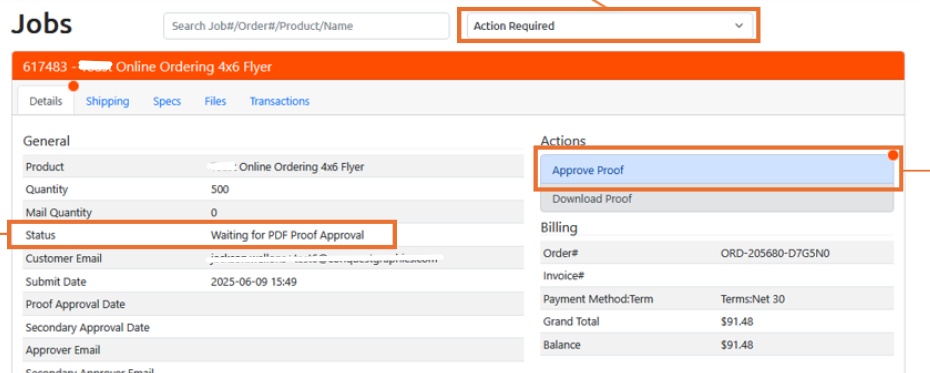
Once logged in, click on the account dropdown in the top right of the screen and select "Jobs" (there should be a number highlighted for the number of jobs that have an "Action Required.")
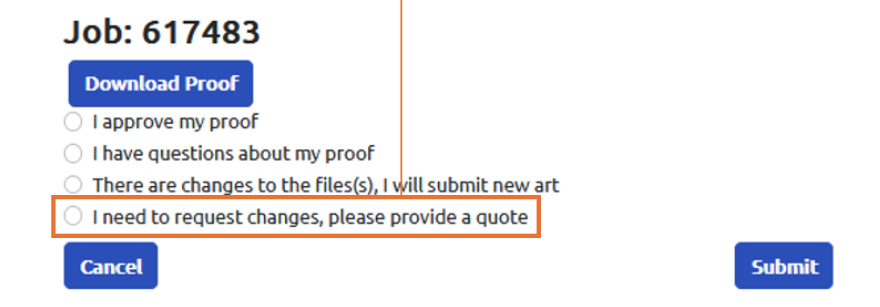
Once on the Jobs screen, if you have any jobs requiring attention, they will be immediately shown under "Action Required." "Job Status" will show as "Waiting for PDF Approval." Click on "Approve Proof" to begin the proof approval process.
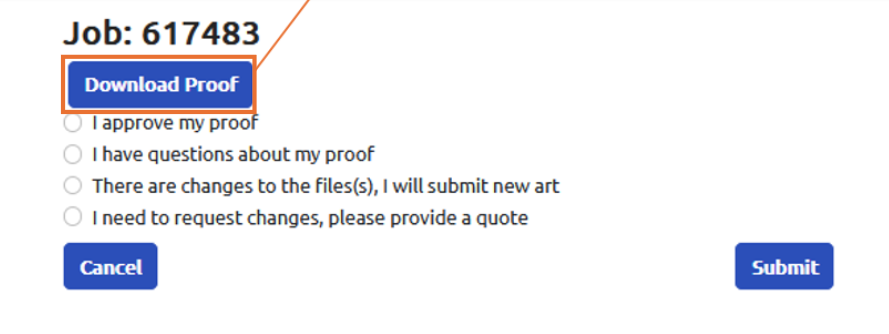
Click "Download Proof" to download and view your PDF Proof file.
After downloading and viewing the proof, if there are no changes needed, simply select "I approve my proof" and then "Submit" to send your job directly into production.
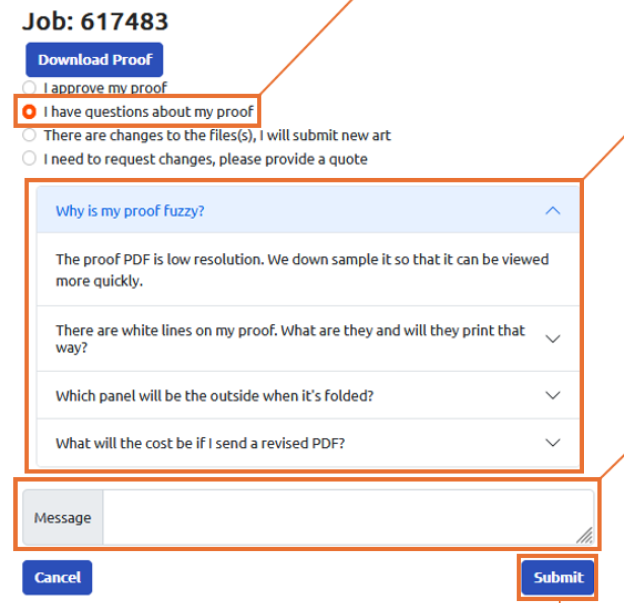
If you have questions after viewing your proof, select "I have questions about my proof." Frequently asked proof questions will appear. Include a message to our prepress team or request a change to your artwork and then click "Submit." Your message will be sent to our prepress team. The job won't be moved into production, and another proof approval will be required after our team has addressed your question or changed the artwork.
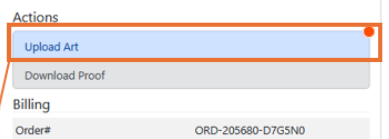
After viewing your proof and you need to upload an entirely new art file, select "There are changes to the file(s), I will submit new art." Click submit. The job listed on your Jobs page will now prompt you to upload new art. Select "Upload Art." Upload the new art file from your local files and then click "Complete Upload" to finish the process.
Select "I need to request changes, please provide a quote" if you need to completely change the specifications of the product you ordered. We will then be in touch, and your current job will not move into production.
You should receive an email with a link to your proof within 2-8 business hours after uploading your file.
Need additional assistance? Click below to chat with our team of experts.
Chat With Us